Polar Bear Blog: Bear Blog, Go, and Google Cloud Run
The Polar Bear Blog is available on GitHub: https://github.com/josephspurrier/polarbearblog.
Last month I came across an article on Hacker News about a free, minimal blogging platform called the Bear Blog (not to be confused with the Bear app which is great as well). The creator, Herman Martinus, built the Bear platform because he wanted a simple way to post content to a minimal website using markdown.
Many people alternatively use static website generators that support markdown like Hugo and Jekyll, but they take a little bit to get configured, pipeline setup, and deployment configured. Bear has a quick sign up process, lets you edit attributes like your title, emoji favicon, and styles, and then allows you to update your home page and create new blog posts/pages. Bear supports markdown so you can create content that looks good pretty easily and focus on your writing instead of fighting with the styling.
After creating a blog for myself on Bear and posting three articles pretty quickly, I realized I hadn’t posted on my own blog in a few years because it required just a little more effort of finding the repo on my hard drive, generating a new page (or copying an old one), getting familiar with the layout again, and then starting to write. The workflow is still simple, but I just didn’t feel like doing that.
I loved the idea of Bear and wanted to replatform (again) my blog of 10 years to support a simpler workflow. I originally started on WordPress then moved over to Hugo a few years ago. Since I’m a Go engineer, I decided to create a derivative of Bear called the Polar Bear Blog (PBB). I’m also a big fan of AWS since I’ve been using it for years at my company, Kion, but it takes a couple services to get a serverless Go web application running - you need both Lambda and CloudFront or a load balancer. I decided to use Cloud Run on GCP. It allows you to upload a Docker image and then map a custom domain for which they will provide an SSL certificate. I figured it should be supported well since Go came out of Google.
After a weekend of coding, I rewrote Bear in Go, got it deployed in Cloud Run, and then converted my blog over from a bunch of markdown files to a single JSON file that was stored in Google Cloud Storage. My blog is what you are reading now. These are the big differences from Bear:
- only available as a self-hosted option
- designed for a single author - there is only one user login
- MFA (TOTP/Google Authenticator) support
- fields for enabling Disqus and Google Analytics
- customizable login URL
- includes ability to edit markdown with StackEdit
One of biggest differences is Bear is a SaaS offering while with PBB, you must deploy and host yourself. To make this process easier, I’ve provided quick instructions on how to get your own copy of PBB on the serverless Google Cloud Run service. The cost should be less than $1 a month (depending on traffic and website content size) since you are only billed on usage. In the next section, I’ll go over the architecture.
Architecture
Code Structure
The PBB is a monolithic Go application. There are a few main.go files available (these can all be called using make):
main.go- this is the entry point for the PBB web applicationcmd/mfa/main.go- CLI app to generate an MFA auth URL and a QR code in the terminalcmd/passhash/main.go- CLI app to generate an encoded hash of a password using bcryptcmd/privatekey/main.go- CLI app to generate a private key for session storage encryption
There are also a few main folder/packages:
app/lib- collection of core packages for data storage, encryption, templating, routing, etc.app/middleware- collection of HTTP handlers that wrap around the router to control authentication, redirects, compression, and loggingapp/model- JSON objects for storage and site settings/contentapp/route- HTTP handlers for all of the pages like login, dashboard, displaying posts, editing posts, etc.app- contains theboot.gofile which sets up all the services needed for the applicationassets- contains the CSS from Bearhtml- contains the Go templates with HTML for all pagesstorage- storage location of the session and site files when developing locally
Templating
The PBB uses Go templates to serve web content. I kept it simple with two main templates: base (public users) and dashboard (logged in user). The header is in its own file and then there are partials for most of the pages like login, post creation, etc. The display of the markdown content (home page, all posts, and all pages) is converted to a partial after converting it to HTML.
Routing
PBB uses one of my favorite routers: way. It’s lightweight and supports path parameters. I typically wrap it in my own package so I can do two things:
- make it easy to call by method:
router.Get(),router.Post() - force all handlers to return a status code and an error
The first one reduces typing and the second one makes it easy to output errors and manage HTTP status codes in a standard way. Here is an example:
// login allows a user to login to the dashboard.
// How you register the route with the router:
// c.Router.Get("/login/:slug", c.login)
func (c *AuthUtil) login(w http.ResponseWriter, r *http.Request) (status int, err error) {
    slug := way.Param(r.Context(), "slug")
    if slug != c.Storage.Site.LoginURL {
        return http.StatusNotFound, nil
    }

    vars := make(map[string]interface{})
    vars["title"] = "Login"
    vars["token"] = c.Sess.SetCSRF(r)

    return c.Render.Template(w, r, "base", "login", vars)
}
In the code above, I register the route with: c.Router.Get("/login/:slug", c.login). The login function returns an HTTP status code and an error if one occurs. The first line gets the login URL since its customizable in the site settings and if the URL doesn’t match, then it returns a http.StatusNotFound (404).
The code below shows how the 404 is handled. The customServeHTTP function is passed to the router to handle all requests. If the status code is 400 or greater, then it will render an error template.
// Set the handling of all responses.
customServeHTTP := func(w http.ResponseWriter, r *http.Request, status int, err error) {
    // Handle only errors.
    if status >= 400 {
        vars := make(map[string]interface{})
        vars["title"] = fmt.Sprint(status)
        errTemplate := "400"
        if status == 404 {
            errTemplate = "404"
        }
        status, err = tmpl.ErrorTemplate(w, r, "base", errTemplate, vars)
        if err != nil {
            log.Println(err.Error())
            http.Error(w, "500 internal server error", http.StatusInternalServerError)
            return
        }
    }

    // Display server errors.
    if status >= 500 {
        if err != nil {
            log.Println(err.Error())
        }
    }
}

// Send all 404 to the customer handler.
notFound := http.HandlerFunc(func(w http.ResponseWriter, r *http.Request) {
    customServeHTTP(w, r, http.StatusNotFound, nil)
})

// Set up the router.
rr := router.New(customServeHTTP, notFound)
In the code above, you’ll notice that 500 errors will output the error since it’s typically a bug that the developer needs to fix while all the 400 level errors don’t log an error because they are typically a user issue.
Storage
To allow the blog to be tested locally without cloud access, there are two data storage providers: one for the local filesystem and another for Google Cloud Storage. If the PPB_LOCAL environment variable is set, then the local filesystem provider is used, else the GCP storage provider is used. This is code from the boot.go file.
var ds datastorage.Datastorer
var ss websession.Sessionstorer

if !envdetect.RunningLocalDev() {
    // Use Google Cloud Storage when running in GCP.
    ds = datastorage.NewGCPStorage(bucket, storageSitePath)
    ss = datastorage.NewGCPStorage(bucket, storageSessionPath)
} else {
    // Use local filesytem when developing.
    ds = datastorage.NewLocalStorage(storageSitePath)
    ss = datastorage.NewLocalStorage(storageSessionPath)
}

// Set up the data storage provider.
storage, err := datastorage.New(ds, site)
if err != nil {
    return nil, err
}

// Set up the session storage provider.
en := websession.NewEncryptedStorage(secretKey)
store, err := websession.NewJSONSession(ss, en)
if err != nil {
    return nil, err
}
Notice in the code below the Datastorer and the Sessionstorer both accept the same objects. These interfaces are in different packages (the first is in the app/lib/datastorage package while the second is in the app/lib/websession package). As long as the object that we want to read or write to satisfies these interfaces, we can use them. This also makes testing easier because we can mock our own storage provider that is in memory and allows us to test the code that interacts with these providers easily.
// Datastorer reads and writes data to an object.
type Datastorer interface {
    Save([]byte) error
    Load() ([]byte, error)
}

// Sessionstorer reads and writes data to an object.
type Sessionstorer interface {
    Save([]byte) error
    Load() ([]byte, error)
}
Sessions
I started out using Gorilla sessions but I had trouble getting the CSRF tokens to work properly since the login URL is two levels down from root and it was creating multiple sessions for every login. I switched over to SCS which worked great out of the box. I built a custom session store with AES encryption using the GCP data storage provider I wrote for data storage. It’s great to be able to use the same providers for multiple purposes. It’s a good idea to encrypt your session information that is stored on the server side since it could have sensitive information in it. In our case, it only will store the CSRF tokens and the logged in user’s name.
// Set up the session storage provider.
en := websession.NewEncryptedStorage(secretKey)
store, err := websession.NewJSONSession(ss, en)
if err != nil {
    return nil, err
}
I wrote a quick test for it to ensure the encryption works. By keeping the packages small, it makes testing easier and use easier.
package websession

import (
    "testing"

    "github.com/stretchr/testify/assert"
)

func TestEncrypt(t *testing.T) {
    key := "59f3726ba3f8271ddf32224b809c42e9ef4523865c74cb64e9d7d5a031f1f706"
    raw := []byte("hello")

    en := NewEncryptedStorage(key)

    enc, err := en.Encrypt(raw)
    assert.NoError(t, err)

    dec, err := en.Decrypt(enc)
    assert.NoError(t, err)

    assert.Equal(t, raw, dec)
}
GCP Deployment
To deploy to GCP, you must first create a new GCP project if you don’t have one already. You can get free trial credits if you have a Gmail account by signing up for GCP for the first time. I also wanted to make it easy to run commands so I created a Makefile . That way there is no need to copy and paste commands when you need to run them. I also leveraged environment variables where possible because they are a standard way to set configurable information. I can set them on my local computer or in Cloud Run and the Go application will read them.
All the environment variables should be put in a .env file. As of the writing, these are the current environment variables:
# App Configuration
## Session key to encrypt the cookie store. Generate with: make privatekey
PBB_SESSION_KEY=
## Password hash that is base64 encoded. Generate with: make passhash passwordhere
PBB_PASSWORD_HASH=
## Username to use to login to the platform at: https://example.run.app/login/admin
PBB_USERNAME=admin
## Enable use of HTML in markdown editors.
PBB_ALLOW_HTML=false
## GCP bucket name (this can be one that doesn't exist yet).
PBB_GCP_BUCKET_NAME=sample-bucket
## Optional: enable MFA (TOTP) that works with apps like Google Authenticator. Generate with: make mfa
# PBB_MFA_KEY=
## Optional: set the time zone from here:
## https://golang.org/src/time/zoneinfo_abbrs_windows.go
# PBB_TIMEZONE=America/New_York

# GCP Deployment
## GCP project ID.
PBB_GCP_PROJECT_ID=my-sample-project-191923
## Name of the docker image that will be created and stored in GCP Repository.
PBB_GCP_IMAGE_NAME=sample-image
## Name of the Cloud Run service to create.
PBB_GCP_CLOUDRUN_NAME=sample-service
## Region (not zone) where the Cloud Run service will be created:
## https://cloud.google.com/compute/docs/regions-zones#available
PBB_GCP_REGION=us-central1

# MFA Configuration
## Friendly identifier when you generate the MFA string.
PBB_ISSUER=www.example.com

# Local Development
## Set this to any value to allow you to do testing locally without GCP access.
## See 'Local Development Flag' section below for more information.
PBB_LOCAL=true
To load them into your local shell, I recommend installing direnv and then creating a .envrc file with this info:
# Load the shared environment variables (shared with Makefile).
# Export the vars in .env into the shell.
export $(egrep -v '^#' .env | xargs)

export PATH=$PATH:$(pwd)/bin
export GOOGLE_APPLICATION_CREDENTIALS=~/gcp-cloud-key.json
You’ll have to type direnv allow first, but this will load the environment variables from the .env file into your current terminal session. This is helpful because when you run any of the make commands, it will also read from the same .env file so you only have to keep these variables in one location.
You can run these commands to deploy to GCP. You will need to have the Google Cloud SDK installed . You will also need a service account key downloaded on your system with an environment variable set to the JSON file like this: GOOGLE_APPLICATION_CREDENTIALS=~/gcp-cloud-key.json.
# Initialize the storage and session files in a Google Cloud Storage bucket.
make gcp-init
# These are the commands it runs to create the bucket, enable versioning,
# and to copy the files to the bucket.
gsutil mb -p $(PBB_GCP_PROJECT_ID) -l ${PBB_GCP_REGION} -c Standard gs://${PBB_GCP_BUCKET_NAME}
gsutil versioning set on gs://${PBB_GCP_BUCKET_NAME}
gsutil cp testdata/empty.json gs://${PBB_GCP_BUCKET_NAME}/storage/site.json
gsutil cp testdata/empty.json gs://${PBB_GCP_BUCKET_NAME}/storage/session.json

# Build a docker image from the Go application and then push to Google Cloud Run.
make gcp-push
# These are the commands it runs to build the docker image and then submit
# to Cloud Run.
gcloud builds submit --tag gcr.io/$(PBB_GCP_PROJECT_ID)/${PBB_GCP_IMAGE_NAME}
gcloud run deploy --image gcr.io/$(PBB_GCP_PROJECT_ID)/${PBB_GCP_IMAGE_NAME} \
    --platform managed \
    --allow-unauthenticated \
    --region ${PBB_GCP_REGION} ${PBB_GCP_CLOUDRUN_NAME} \
    --update-env-vars PBB_USERNAME=${PBB_USERNAME} \
    --update-env-vars PBB_SESSION_KEY=${PBB_SESSION_KEY} \
    --update-env-vars PBB_PASSWORD_HASH=${PBB_PASSWORD_HASH} \
    --update-env-vars PBB_MFA_KEY="${PBB_MFA_KEY}" \
    --update-env-vars PBB_GCP_PROJECT_ID=${PBB_GCP_PROJECT_ID} \
    --update-env-vars PBB_GCP_BUCKET_NAME=${PBB_GCP_BUCKET_NAME} \
    --update-env-vars PBB_ALLOW_HTML=${PBB_ALLOW_HTML}
Local Development
If you do want to modify the application, I would recommend trying air because it handles reloading for you so you don’t have to manually stop and start the web server between changes. I’ve included a .air.toml file so it watches the Go, template, and CSS files for changes.
Also, ensure you have the PBB_LOCAL=true environment variable set. When its set, the following things will happen:
- data storage will be the local filesystem instead of in Google Cloud Storage
- redirects will no be attempted so you can use localhost:8080
- MFA, if enable will accept any number and will always pass validation
- Google Analytics will be disabled
- Disqus will be disabled
I’m really happy with how everything turned out. The Bear Blog was great inspiration, and this project was a good way to learn how to use a few of the Google services. Have fun!
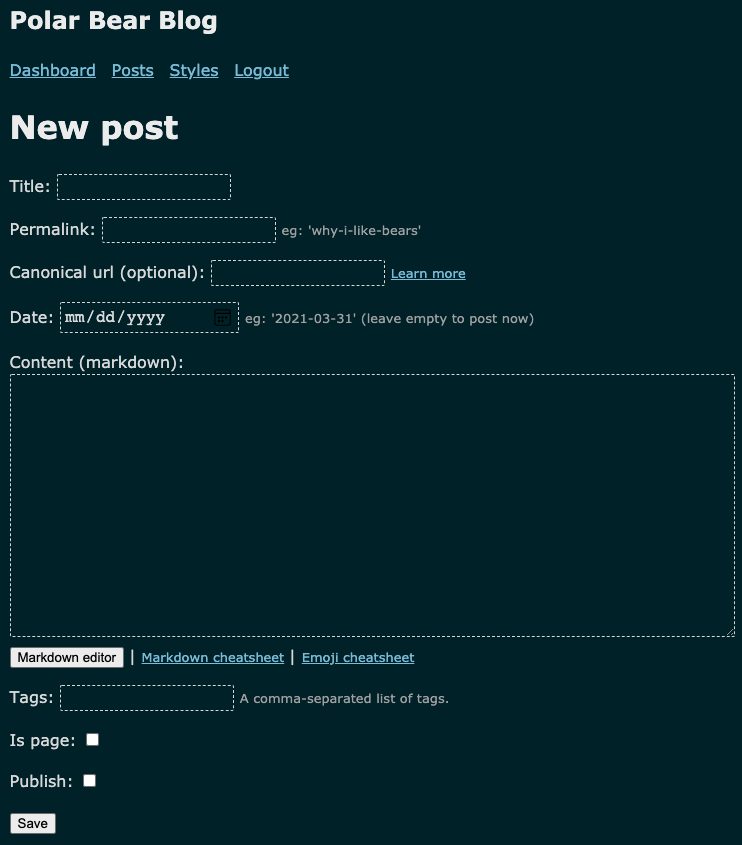
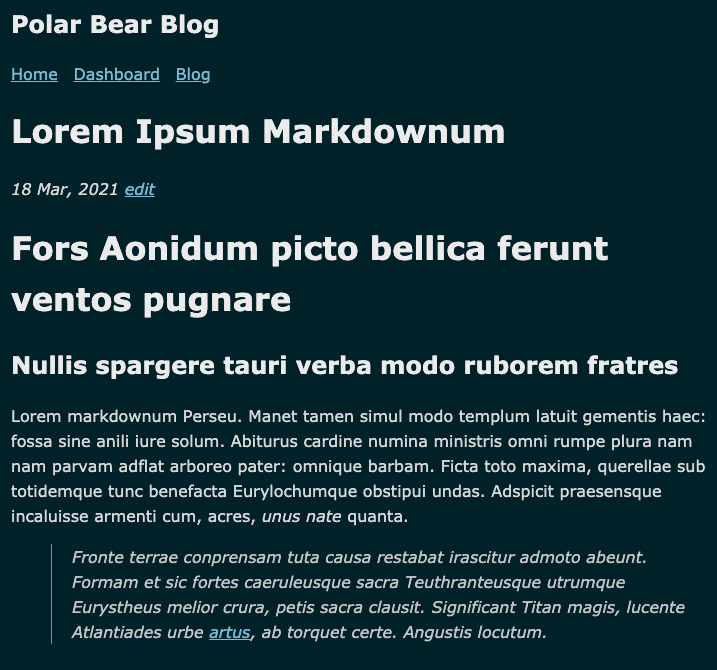
Screenshots
These are screenshots of the Polar Bear Blog.
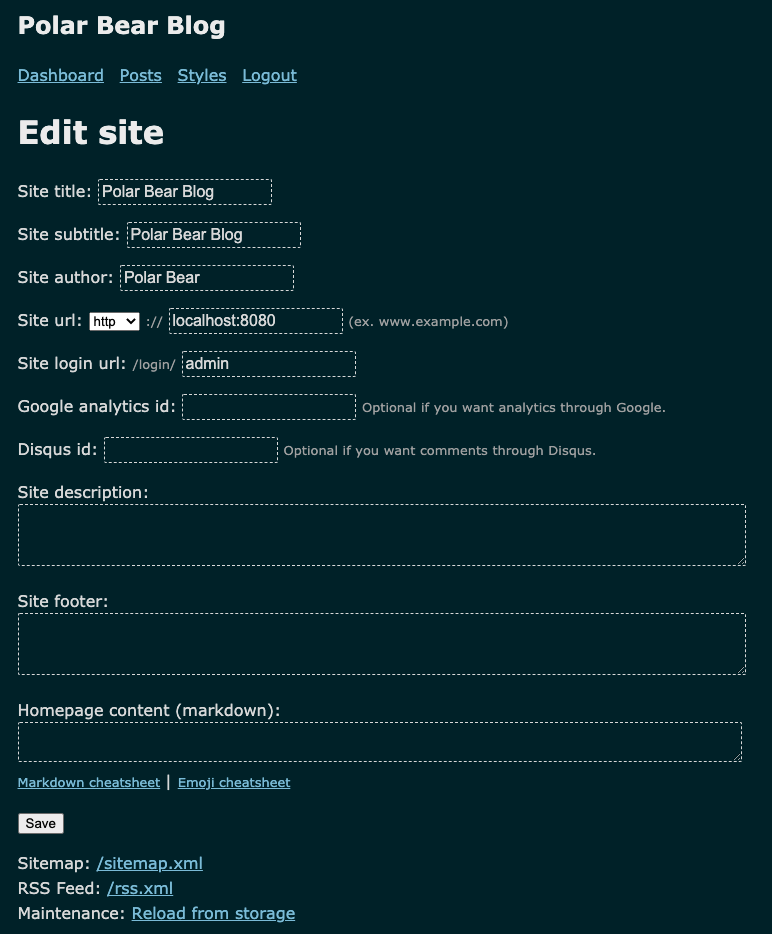
Home Page
Dashboard
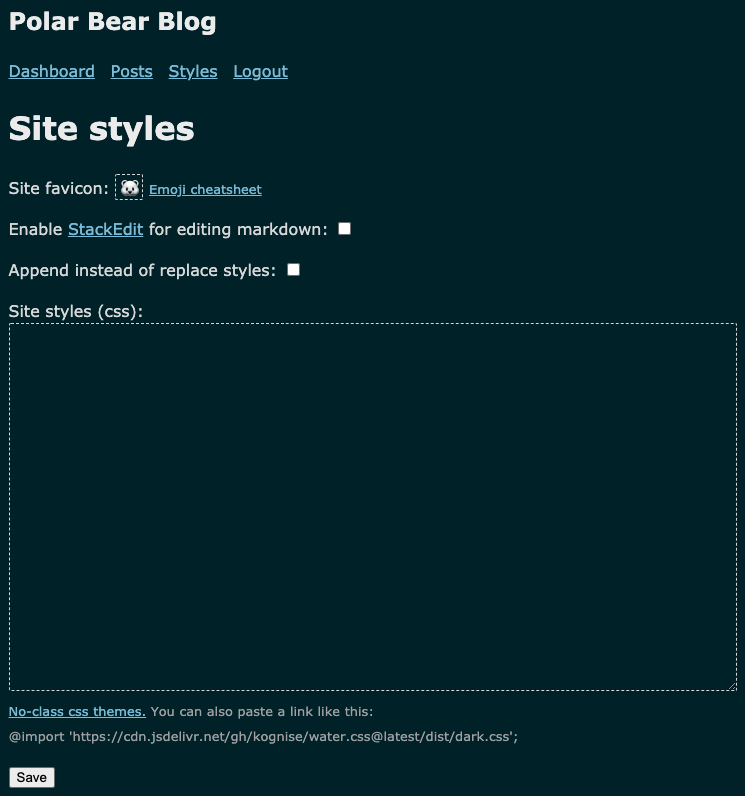
Custom Styles
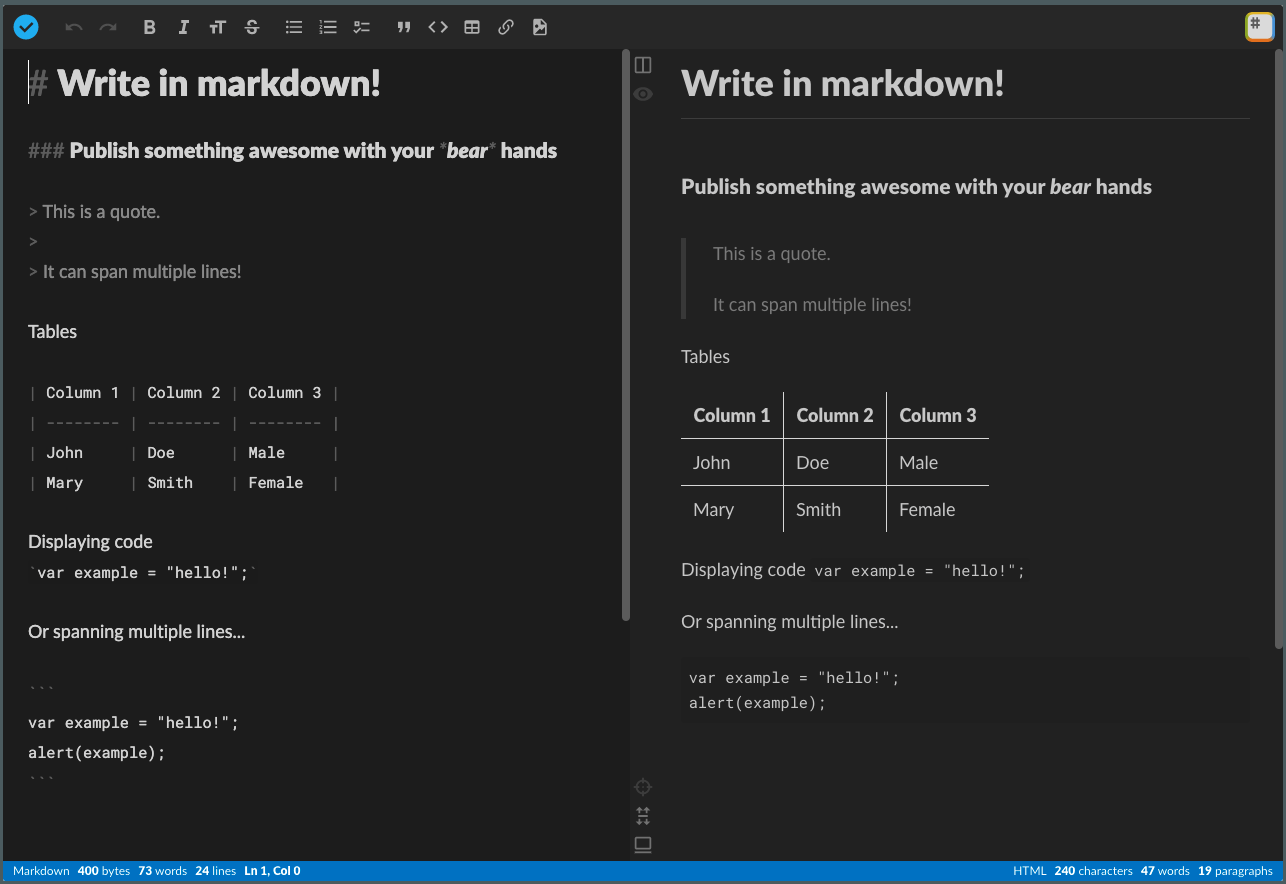
Create a Post
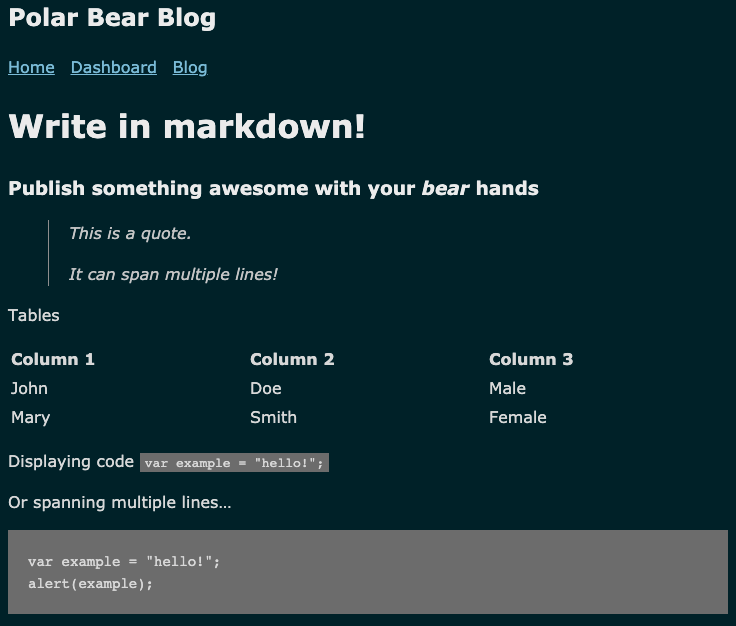
View a Post
StackEdit